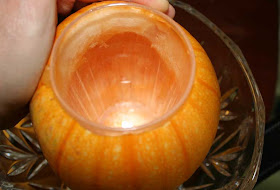
To a child, a carved pumpkin is a masterpiece when it's finished. Today, four-year-old Eli and I set out to carve his Halloween pumpkin. Even though I felt there could could have been a few changes -- Eli felt it was absolutely perfect.
We decided on our design by looking thorough magazines and then gathered our tools (a sharpie and a large knife) and started the project. I drew on the design and when I turned my back, Eli drew some extra figures on the face with magic marker. Of course I thought it probably added to the overall design.
Cutting out the face make me a little nervous but Eli was very careful not to touch the knife -- only my arm that was holding the knife, so he was a big help.
The carrot nose was added and even though I thought it was the proper length, Eli decided it needed to be shortened so he bit off the end and had it for an afternoon snack. It wasn't exactly what I had envisioned, but again, Eli liked it.
Later we had to "practice" blowing out the candle over and over until I decided he had practiced enough and it was time to put the candle away for the night.
It didn't look exactly like the photos from the magazine but we both thought it was a wonderful experience. Tomorrow I wouldn't be surprised if we added some extra decorations to the pumpkin -- maybe even a new, longer nose that doesn't have a bite out of it.
Friday, October 30, 2009
Thursday, October 29, 2009
Our fall garden
I must admit that our fall garden is really growing. It's not perfect, but it is producing a number of things, especially the peas in the photo above. We planted green peas and pea pods. We are so excited about our peas and even though I haven't seen a pod yet, there are blooms. That is a great start. I expect the peas to follow as soon as we have several days of sun.
The jalepenos are beginning to turn. A sure sign the weather is getting cooler (not to mention the temperature!).
We have lettuce! This nice buttercrunch variety will be sweet and tasty.
The cayennes are turning red very quickly, now.
The carrots are looking good. I have read that the carrot's size is determined by the tops that are above ground.
And then there are the greens. This kale above just keeps growing. We are cutting it with scissors and letting the underneath part grow large before we cut the next batch. It is one of our favorites.
Wednesday, October 28, 2009
For fall -- "Mum's the word!"
There is not a flower that exemplifies a season like the mum for fall. This year they are everywhere and I must admit I really love them. Just set out a pot and you instantly have a fall celebration. Add other fall decorations and you have something really special. Decorating doesn't have to be complicated or even expensive. Just a pot of fall mums.
Monday, October 26, 2009
Another October birthday
We have two birthday girls in our family with October birthdays. Yesterday you saw my granddaughter's cake and today we celebrated my Mother's eighty second birthday.
I tried something new, a chocolate, chocolate cake. I must admit it was yummy.
I got the recipe from my friend Angela who recently made cupcakes from this recipes for a wedding and posted the recipe on her blog. My husband and I tasted one of her cupcake creations and I knew I could make good use of her recipe.
The original cake recipe is from the Hershey's website and the frosting, I adapted from the back of the Hershey's tin. I like to use whipping cream, rather than just butter alone, when decorating a cake because it is lighter than butter and makes a firm frosting.
The cake is very much like a devil's food cake but I think it is much better than the boxed version. This one is moist, very rich and delicious.
I would have used the original recipe but I realized I was out of baking powder so I had to adapt the recipe for self-rising flour. This is what I came up with.
Chocolate (cocoa) cake
Chocolate Cream Frosting
2 sticks butter
2 lbs. confectioners' sugar
1-1/3 cups cocoa
2/3 cups whipping cream
2 teaspoons vanilla extract
Milk to thin
Beat butter in medium bowl. Stir in vanilla flavoring. Add powdered sugar and cocoa alternately with cream, use milk a tablespoon at a time until frosting is easy to spread.
I tried something new, a chocolate, chocolate cake. I must admit it was yummy.
I got the recipe from my friend Angela who recently made cupcakes from this recipes for a wedding and posted the recipe on her blog. My husband and I tasted one of her cupcake creations and I knew I could make good use of her recipe.
The original cake recipe is from the Hershey's website and the frosting, I adapted from the back of the Hershey's tin. I like to use whipping cream, rather than just butter alone, when decorating a cake because it is lighter than butter and makes a firm frosting.
The cake is very much like a devil's food cake but I think it is much better than the boxed version. This one is moist, very rich and delicious.
I would have used the original recipe but I realized I was out of baking powder so I had to adapt the recipe for self-rising flour. This is what I came up with.
Chocolate (cocoa) cake
2 cups sugar
1-3/4 cups self-rising flour
3/4 cup cocoa (I used Hershey's)
1-1/2 teaspoons baking soda
2 eggs
1 cup buttermilk
1 cup boiling water
1/2 cup vegetable oil
1 teaspoon vanilla extract
Heat oven to 350 degrees. Grease and line two 9" cake pans with parchment or waxed paper. Combine dry ingredients in large bowl. Add all wet ingredients and beat on medium-high speed of mixer 2 minutes (batter will be thin). Divide between cake pans. Bake 25 to 30 minutes or until wooden pick inserted in center comes out clean. Cool and remove from pans. Frost with chocolate frosting.1-3/4 cups self-rising flour
3/4 cup cocoa (I used Hershey's)
1-1/2 teaspoons baking soda
2 eggs
1 cup buttermilk
1 cup boiling water
1/2 cup vegetable oil
1 teaspoon vanilla extract
Chocolate Cream Frosting
2 sticks butter
2 lbs. confectioners' sugar
1-1/3 cups cocoa
2/3 cups whipping cream
2 teaspoons vanilla extract
Milk to thin
Beat butter in medium bowl. Stir in vanilla flavoring. Add powdered sugar and cocoa alternately with cream, use milk a tablespoon at a time until frosting is easy to spread.
A castle cake for a little princess
This weekend was my granddaughter's fifth birthday party. The party theme was, of course, a princess party and my granddaughter was, of course, a princess, complete with a tiara. Pronounced "ti-ah-ra" by our little princess. The one thing she needed was her own castle and it was up to me to produce one for her. This fully edible one (except for the flags) is made with cake, butter cream frosting and fondant.
The white cake was an old standby recipe made with two 12" layers, two 8" layers and turrets made from cake cooked in cans and fondant formed into round pillars. The turrets get their pointed roofs from ice cream cones covered with frosting. I was thinking about making the turrets out of something like paper towel rolls but I finally decided to make it all edible. I used the tins from empty Republic of Tea cans and they were the perfect size.
The "stone" was painted on food coloring, using a paint brush and it took approximately 5 cake recipes to make the cake and four recipes of butter cream. All in all it took about 10 hours to decorate, because I had not used fondant before, except on a limited basis.
The decorations and flowers are made from butter cream, piped on using a decorating bag.
The result: Everyone loved the cake and the little princess really loved it. I don't think people like a fondant cake quite as well as a butter cream one, and I do think the fondant was harder to work with, but I think with time and experience, I could improve on it. Overall, I think it was a big success.
Amazingly, the little princess blew out the candles in one try. Of course, all her wishes came true.
The white cake was an old standby recipe made with two 12" layers, two 8" layers and turrets made from cake cooked in cans and fondant formed into round pillars. The turrets get their pointed roofs from ice cream cones covered with frosting. I was thinking about making the turrets out of something like paper towel rolls but I finally decided to make it all edible. I used the tins from empty Republic of Tea cans and they were the perfect size.
The "stone" was painted on food coloring, using a paint brush and it took approximately 5 cake recipes to make the cake and four recipes of butter cream. All in all it took about 10 hours to decorate, because I had not used fondant before, except on a limited basis.
The decorations and flowers are made from butter cream, piped on using a decorating bag.
The result: Everyone loved the cake and the little princess really loved it. I don't think people like a fondant cake quite as well as a butter cream one, and I do think the fondant was harder to work with, but I think with time and experience, I could improve on it. Overall, I think it was a big success.
Amazingly, the little princess blew out the candles in one try. Of course, all her wishes came true.
Friday, October 23, 2009
Taking a look at the trees
If I had the job of giving out prizes for beauty, our trees would take first place in any decorating contest. So, if we are going to take a look at fall decorating, I think it's a good idea to first take a look at the natural beauty that surrounds us. Here in the south, the leaves are just beginning to turn. Sometimes we are too busy doing other things to even notice until the leaves start falling all around us -- then it is hard not to notice.
They are one thing to be thankful for.
Wednesday, October 21, 2009
Halloween decorations
It's the Wednesday before Halloween, and even though I tend to like more organic decorations during this season, who can resist fat smiling pumpkins -- and they light up!
These are in front of the Halloween Shop in downtown Newnan. In the next few days, I hope to show you some more creative decorating ideas from local people and businesses.
Tuesday, October 20, 2009
Chestnut Hill Shops
The Cheese Shop at Chestnut Hill beckoned us in as we walked down the street. We just had to go in and see the beautiful assortment of cheeses and snack foods. It had an old world charm we just couldn't resist. You don't see too many shops like this in the rural south!
We looked around and after getting permission to take a photo, the proprietor cut us a sliver of sheep's milk cheese (I think it was a Jarlsburg). It was SO delicious.
If you have a milk allergy, this cheese might be worth a try. Sheep's milk and sheep's milk cheeses are more digestible than cow's milk products. They're pricey, but probably the best cheese I've ever tasted.
I had to include Bone Appetite in my tour. You don't often see a small shop exclusively for dogs but I can tell you they have every thing your trendy, petted pouch could desire.
Dog fashions, pillows, grooming aids and in the back, a homemade pet food area. I think it is "dog exclusive." Sorry cats.
Monday, October 19, 2009
The Farmer's Market at Chestnut Hill
We recently spent 10 days in Philadelphia, Pa. in the quaint town of Chestnut Hill. It is an area that has a very old downtown area, with cobblestone streets. There were old shops, trendy stores and restaurants on most every corner that served cheese steak. One of my favorite places -- a market with beautiful produce.
This market had the most beautiful fresh produce I have ever seen. Everything was obviously fresh and I felt that anything we bought would be very good -- and I was right.
The best thing we bought were the Brussel sprouts. They were very big, tasty and easy to cook, but then everything they had was fresh and delicious.
I think it is good, for a gardener to see what kind of produce is possible. I loved everything and got some new ideas for next year's garden, including bok choy and of course, Brussel sprouts.
We also bought fresh carrot juice from the juice bar. It made me wish I could go to the corner market at home rather than the supermarket.
Friday, October 16, 2009
An easy, spicy condiment
Using red peppers to spice up a dish or something like pizza is very popular, especially with my family.
It's also easy to do. I gathered and washed the peppers, put them in the food dryer and the next day I just de-stem and chop them up, .
All the chopped peppers go into a shaker jar, which can be purchased at the grocery store. Pretty, red, organic -- and it would make a great gift from your kitchen, especially in the smaller jelly jars. Use a green ribbon for Christmas.
Just so you know, the green peppers will dry fine, but they don't look as pretty as when they turn red. They turn kind of a drab olive-brown color. The red ones remain a beautiful, deep red.
Thursday, October 15, 2009
Saving time with online newsletters
Have you ever spent lots of time searching the Internet for decorating ideas or recipes and you just gave up because there were too many places to look? I've often had that problem and I have found one good solution.
I sign up for online newsletters and let the information come to me.
My favorites are the holiday workshops by Martha Stewart Living. There are so many ideas, recipes and crafts for fall, Christmas, Easter and every holiday, really. You have to sign up for an email reminder to sign up for the workshops. They are so informative -- I really love them.
In addition to the holiday newsletters, I receive a Cookie of the Day newsletter, an Organizing Tip of the Day newsletter and then there is the regular newsletter.
I also receive the Everyday Food -- Dinner Tonight newsletter.I receive the Organic Gardening newsletter that comes once a week, I think. It has some good gardening tips.
I signed up for the Mother Earth News newsletter and I have received quite a few good ideas. It would be even better if I was a "self-sustainer." It's not as upscale as some newsletters but it can be very interesting.
I also receive a Southern Living newsletter and I enjoy their countless decorating tips. If you click the Newsletter button on the Southern Living website, you will see a list of daily and weekly newsletters as long as your arm.
Another good one is the tips newsletter from RealSimple. Sometimes they are a little too simple, but I enjoy them.
I can't tell you all the online newsletters I've tried and didn't like. I really like to receive the information from the ones I enjoy, and I also like it that I can unsubscribe and they just stop coming -- unlike SPAM.
Tuesday, October 13, 2009
Fall decor
It is time to buy a pumpkin and decorate for fall. I think fall is by far the easiest seasonal time to decorate. You can buy a few organic items to display here and there and it looks like you've made quite an effort.
Children love to decorate -- and they love pumpkins.
Fill a pot with some seasonal flowers -- easy and so perfect for the season.
Mums are so perfect for this time of year, in golden yellows, oranges, burgundy and purples.
You can make or purchase so many items to display each year at this time. This metal pumpkin is an interesting idea and wouldn't be too hard to make.
Or just display a basket of assorted fall squashes. Perfect. Anyone can decorate a table using these and a simple basket.
Monday, October 12, 2009
Garden progress
We have been out of town for a little over a week and we couldn't wait to get back to see our garden progress. My post is late because I wanted to give an update. We were quite pleased that things were really looking good -- actually, better than I expected.
Above at left, the butter beans are still growing. The potatoes are not up, yet but the kale, lettuce and green peas are looking good. We do have grass. I don't think there is any way to get away from grass and weeds.
The pea pods, garlic, collard greens and carrots are growing nicely.
The turnip greens are probably big enough to eat.
A closer view of collard greens. My husband thinks we will have a nice harvest for Thanksgiving.
We inspected our experimental greens garden, where we just tossed out leftover seed greens and fertilizer. That is doing well, too.
I didn't show you our pumpkins that really haven't produced anything. I am hoping for the best but I think I need to start looking for a good carving pumpkin.
Friday, October 9, 2009
A backpack -- to the rescue
Traveling with children can be trying at times, and I usually spend some time before a trip racking my brain to come up with something that will be interesting and keep them from becoming too bored. It is especially hard when they will be cooped up inside much of the time.
I have decided that a backpack full of craft and fun items is probably the best way to meet my objective of safe, clean, quiet and busy fun. After all, it works for Dora and Diego, so maybe a backpack will save the day when we travel.
In order to find some items to pack my backpack, I went to Michael's with coupons. I am sure any craft store would have quite a few fun items, too -- but I am used to Michael's and I get coupons on the Internet I download for savings.
I did find quite a few items on sale. I bought a large and a small sketch pad, a Bristol pad, coloring books, colors, a small container of clay (play dough), a foam sticker packet of little people, football stickers, craft glue, sharpened pencils (with Halloween designs), and Halloween stickers, a package of Halloween items with a spider, a pumpkin head and a little man with a pointed hat.
I also put in some scissors, something to snack on and a package of wipes. The play dough will need a mat and it would be nice to add a little trash bag of some kind, some gallon size baggies and a few healthy snacks.
What I have now is a bag filled with imagination and I think it will help with busy little hands. I intend to update it with seasonal crafts and add to it as supplies get low. The initial reaction is good, but I am not expecting miracles.
Thursday, October 8, 2009
Pumpkin centerpiece
Making a pumpkin centerpiece for your Halloween, Fall or Thanksgiving table is so easy to do. Pictured above is a centerpiece made from a pumpkin we grew this summer, in our garden.
I have always been interested in decorating with everyday things so it is just the kind of centerpiece I like -- cheap and made from something that is organic and fresh. Children enjoy making these kind of things and I would recommend making this with a child because it is easy to do and the results can be good. Just take care when using a knife with children and give them plenty of supervision or cut the hole in the pumpkin before allowing them to help with the project.
To make the arrangement: First take a pumpkin, of any size. Cut out a hole for a glass or vase, depending on the size of the pumpkin.
I used a small plastic glass for mine. I then put water in the vase, set the pumpkin in a container of some kind (I used a glass dish.) and add flowers. I purchased a small bunch of flowers from my local grocery store but cutting your own from your garden would be even better. It is the time of year for carnations, but flowers like zinnias are still blooming.
You may decorate the base, if you wish. I used leaves from my garden.
One reason I decided to use the vase inside the pumpkin was that I want to bake the pumpkin to use later for pumpkin soup or a pie. If I had just put water and flowers into the vase, it would not have lasted very long and reusing the pumpkin would not have been an option.
Wednesday, October 7, 2009
A garlic gadget
I will admit I hate to cut up garlic. I have been known to use dried garlic, even though I know my dish won't turn out quite as well -- all because I didn't want to have stinky hands. That is why I like gadgets like this Chef'n Garlic Zoom Garlic Chopper. I don't know how it will work in the long run but so far, I like it.
It is simple to use. Just open the little door on the top and drop in a peeled garlic clove. Then just roll the little wheels on the counter and the chopping is done.
The little blades finely chop the garlic.
Open the center, take out the blade, dump out the garlic and you are done. It was that simple, and it is top dishwasher safe. I don't know how long it will last or how long the blades will stay sharp, but so far, so good. It will chop shallots, too.
I just love kitchen gadgets.