Wednesday, May 11, 2011
“Cuttin' Up and Showin' Out ”
Tuesday night I attended our county's monthly Backyard Association meeting. Usually the topic is something like garden pests, native plants or perennials, but this time the featured speaker was Cheryle Turner from Hampton, Georgia. Cheyle delighted us with her creative vegetable and fruit carvings. She uses them to decorate vegetable and fruit trays. It is a given that when she throws a party, the guests will be delighted with the imaginative centerpieces and whimsical carved "animals" she makes.
She showed us a strawberry "rose" centerpiece with kale and lettuce "greenery." (You can see it above, thanks to a photo by Diane Comonoor.)
She then made an eggplant man from an eggplant, toothpicks and cuttings from radishes, bell peppers, kale and a grape.
She also made an easy duck was made from a squash, a carrot and two cloves and a mouse from two radishes and some cloves.
I thought her carvings looked easy, didn't take her very much time at all and required normal kitchen tools. She also sold little booklets with instructions for all her creations. I think I will use this book for my next vegetable tray. She had some really good ideas and it looks easy -- we will see.
Cake disaster tip
Several weeks ago I had a kitchen disaster. The tried and true pound cake recipe I had been using for years, with great success, got stuck in the pan and came out in at least a hundred pieces (or more). I think my old pan needs replacing. It was very disappointing and our guests that evening had a dessert that had great flavor, but looked like a bomb went off in the oven that caused it to disintegrate.
I immediately put the remainder of the cake in a gallon freezer bag and stuck it in the freezer. I knew that an opportunity to use the crumbs would arise if I just waited.
Sure enough, I needed to make a quick dessert and I just grabbed a can of low-fat whipping cream, squirted a little in the bottom of a dessert dish then layered some cake crumbs, strawberries and a little more whipped cream. Prep time for each dessert -- maybe a minute, each. I only needed to make enough desserts for what I needed at that moment. No leftovers and I could have the can of whipped cream, strawberries and cake crumbs ready for more, when needed. Quick, easy and my cake disaster was turned into a triumph.
I wish all my kitchen disasters had silver linings, like this one.
Tuesday, May 10, 2011
Recipe Redo: Cheesecake squares
So often while cooking, I wish I had replacement recipes for my great dishes that taste so good, but are loaded with fat, sugar or things we are allergic to. That's why I have decided to start a series of recipe redos. Some will be old-fashioned standbys and some will be new. I am really interested in turning Southern standards into good and healthy (or healthier) versions of the the foods we love.
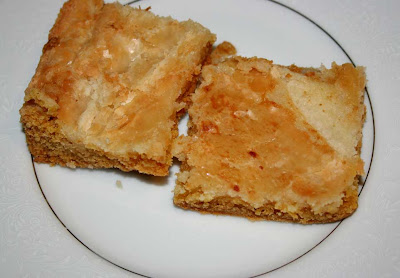
The first recipe I decoded to redo -- Cheesecake squares. I hope to have the privilege of changing many more recipes and I hope to keep the basic flavor and texture while taking away much of the fat, sugar and calories. This recipe doesn't contain milk and eggs but it does contain wheat. The original version starts with a cake mix and then a creamy cream cheese topping is added, then baked. This one is similar and I think it could be a great replacement for the original. The fats used are much healthier than the original and the sugar content is much lower. First I will list the redo, followed by the original recipe. Hope you like it. This recipe passed our family taste test.
Vegan Cheesecake Squares
Bottom layer
1/2 cup vegan margarine
1/2 cup coconut oil
3/4 cup brown sugar
2 cups all-purpose flour
4 tablespoons tapioca flour.
Preheat oven to 350 degrees. In a mixer blend margarine and coconut oil until well mixed. Add brown sugar and blend well. Add flours and mix well. Press mixture into the bottom of a greased 9 x 13 pan. Using a fork, pierce the top all over so that the filling can seep into the cookie crust.
Filling
8 ounces soy cream cheese (like Tofutti or Vegan cream cheese)
1/2 cup plus 2 tablespoons powdered sugar
1 teaspoon vanilla flavoring
2 teaspoons lemon juice
1 tablespoon tapioca flour
Add all ingredients in a mixing bowl and mix, well. (It will be creamy and a little fluffy.) Spread over the bottom layer and bake in the oven for 350 degrees for 20 minutes or until done. It is done when the filling becomes firm and browns a bit. Don't overcook!
Below -- the original recipe.

Cheesecake Squares (Original Recipe)
Bottom layer
1 box yellow cake mix
1 stick of butter, melted
1 egg
Filling
12 ounces (1-1/2 packages) cream cheese, softened
1 box confectioner's sugar
1 extra-large or jumbo egg (if eggs are very small, add 2)
Preheat oven to 350 degrees. Mix the bottom layer by melting the butter in the microwave for 30 seconds, add the cake mix and egg until well-mixed. It will have a dough-like texture. Line a jelly roll pan or cookie pan with sides with parchment paper and mash the dough into the bottom of the pan. If not using parchment paper, spray the bottom and sides of the pan with cooking spray. Don't spread the dough up the sides. This will be a thin layer.
In a mixing bowl, best the cream cheese and add the Confectioner's sugar and egg with the mixer until smooth and creamy. Pour mixture on top of the bottom layer. Make sure the the filling covers the bottom layer but it doesn't have to go all the way to the sides of the pan, it does need to completely cover the dough mixture.
Bake at 350 degrees for 25 to 30 minutes or until the filling is firm and lightly browned. Cracking on the top is normal. Allow to completely cool. Lift the entire pan of bars onto a cutting board and cut into squares. I like using a pizza cutter. Makes approximately 30 large or up to 45 smaller bars.
Monday, May 9, 2011
Please bring me some of that bok choy
For Mother's Day lunch we to picked some bok choy for a sauteed dish. I thought it would be an OK dish but I really didn't know that people would really like it.
Bok choy is a mild cruciferous vegetable used mostly in Chinese cooking. It is high in vitamins and minerals and has a mild flavor. I have used it in soups and Chinese stir frys but I have never before just sauteed a big bunch of it. (I have never before has so much of it!)
That is because we planted a really big row of it a couple of months ago and it is ready to harvest now, we decided we really needed to cook some up. It would be best if we cooked up a lot it it, but, I was a bit nervous about serving an unusual green vegetable for a special day like Mother's Day -- always a family get-together day for our family -- but I just have so much of it.
We picked, washed and chopped it, then sauteed it in a large iron skillet. I added salt, pepper and onion powder to taste, cooked it, drained some of the water (bok choy is very watery) and cooked it a bit longer and surprisingly, it was a hit.
Everyone asked what the vegetable was before they tried it, but it got overall good reviews. I thought it was particularly good with grilled chicken.
My mother-in-law even called to ask what the vegetable was, and if we had more, would we please bring her some. I didn't expect that at all. She rarely asks for vegetables, especially greens because she doesn't like having to wash it.
I don't mind giving her some at all. We will be eating it plenty in the next couple of weeks because I have read it really doesn't freeze well.
Thursday, May 5, 2011
Progress in the garden
We are making some changes in the way we do things in the garden this year. There will be more wide rows, mulch and raised beds. It is so much work to get this method started but I think we will have greater success in the long run. It has taken me a couple of days to get this all together for my blog so I will start the tour with a photo of my pretty cabbages above and then continue with the new stuff. There is nothing prettier than cabbages at this time of year. We have been treating them with BT to kill the worms that start about this time of the spring.
The big change is the wide rows with a paper barrier and plenty of mulch. Above, the wide row. We dug out a trench on each side and put the soft dirt on the center and then smoothed it out to form a raised bed. I always thought that if you had to pick up a shovel, the back-breaking work had begun. I found that wasn't true in this case. This was the easy part.
On top of the bed we laid down four layers of paper. This is newspaper -- not the shiny or slick circulars but the regular kind. This paper was some end rolls I had but printed newspaper works fine. It doesn't matter about the ink because it is most often soy based. Do not try this on a windy day unless you are prepared with large stones or pieces of wood to keep it in place until you lay down the mulch.
Now for the hard part, mulch. Putting the mulch in wheelbarrows and spreading it out was the hard part for us. My muscles are groaning, just thinking about it. We smoothed a nice, thick layer of mulch. Wheat straw is probably better, but this was free so it is what we used.
We then dug a hole for our plants through the paper and staggered the plants on the beds. In the hole we poured our fertilizer, inserted the plant and rearranged the mulch around the plant.
These are the Celebrity tomatoes we raised from seed.
In the center we are putting cardboard and will top it with mulch to prevent weeds from growing. No more nut grass, I hope! We haven't gotten all the cardboard we need, yet. We are probably going to the dump to pick up some boxes.
This is a finished photo. We will be adding more mulch here but our tomatoes really are looking good. We have sixty-plus tomato plants and about twenty-five pepper plants -- all of various types and sizes. We planted Heirloom Red, Celebrity, Kellogg Breakfast, Jubilee, Roma, Green Zebras, Big Rainbows, Purple Calabash and Strawberry tomatoes and we will be planting some cherry tomatoes of various types and colors in other spots. We may plant some in our beds at home around our homes and on the deck. It would be nice to pick fresh tomatoes for salads and snacking by just walking out the back door.
Yes, we did get carried away by the vast array of tomato varieties. We need to restrain ourselves next year, but when I see a seed packet for an unusual variety, my imagination runs wild.
The mild pepper varieties: Green, Red and Yellow Bells, Pimentos, Sweet Bananas and a mild Jalapenos. The hot varieties: Cowhorn peppers, Jalapenos, a giant Jalapeno, Cayennes, a Cayenne Bell and somehow we picked up a Pablo Ancho. I think that might be mildly hot, but I will have to research it a bit. It was an accident, but the kind that might lead to something good. I can see a stuffed Mexican pepper dish in my future.
We planted a few eggplants, too, Black Beauties and Ichiban.
Now for the rest of the garden. Our peas have just exploded. Our pea vines are just loaded with peas.
We are waiting for them to fill out.
I couldn't resist showing you these pretty vines.
Our squash are looking good. We are monitoring closely for pests and spraying with BT once a week.
We staked our green beans, too. They haven't started running yet but climbing will begin soon. Now we have to devise a staking plan for the tomatoes.
I am hoping that the time we spent on this gardening method will benefit us by adding the needed compost material and will stop our weed problem. Weeds are a backbreaking chore, much like mulching.
I have to go and rest now.
Tuesday, May 3, 2011
My most unusual yard sale find
The other day I was at a yard sale when the homeowner said, "Hey, does anyone want any of these hostas? I am moving and my grandmother planted these. I don't really want to leave them behind."
The price per clump? Three bucks! I immediately said yes. They got out a shovel and I brought home a big clump of hostas, separated it and planted them along the front of my home, in my shrub bed. Another lady behind me said, "I will take the rest!"
I have made up my mind about one thing. When someone offers me plants, or a plant deal, I should jump on it, even if the timing isn't convenient. I also must keep a pair of gloves, a couple of tools and a bucket in my car to take advantage of these opportunities.
This one doesn't happen very often and hostas are one of those plants that don't need tons of care and are great for shady spots -- and my yard is mostly shady. I will just add compost from time to time and protect from slugs and small animals. Deer really love these plants, but at the front of my house I don't think I will have problems. The only worry I have is the little chipmunk that has recently taken up residence in my front yard. I am hoping they will grow bigger and I will keep on splitting them and adding them to other beds in my yard.
While this is my most unusual yard sale find, I think I will keep my eyes out for more similar items. Gardening pots and even plants are now on my yard sale list and I will take advantage of everything like this I can find.
Monday, May 2, 2011
English peas from the garden -- with recipes
I was never a big fan of English peas growing up. I especially didn't like canned English peas. My parents, agreed on most things, but English peas was not one of them. It wasn't a point of contention in their marriage -- my mother loved them -- my dad said he had eaten too many cans of cold English peas while riding across Africa, Italy, France and Germany in his World War II era tank, that he could never get excited about another green pea.
But he did grow up a member of the clean-plate club and would always take a helping and eat them. After the meal he would politely tell mother that he enjoyed his dinner, but she always knew he didn't love his English peas.
I agreed with my dad as long as the canned peas were on the table, but I have changed my mind now that I have English peas in my garden.
On a warm sunny day while picking, we noticed the peas were good enough to pluck, shell and eat right from the pod while "pea-picking." The variety above are Sugar Snap English peas. We also picked pea pods for our salads and Oriental dishes. If you pluck English peas before they fill out, you can also add the underdeveloped peas to to salads or stir frys.
Our pea pod variety is Alaskan snow peas and we intend to plant even more of them next year because they are so sweet and good. The large pods are a perfect complement to salads or stir frys. I like them as a snack, too - so sweet and delicious.
Here are a couple of my favorite early pea recipes.
Veggie Stir Fry
(with directions for adding meat -- sometimes in my family we cook the veggie stir fry and then have chopped, cooked meat ready for the meat-lovers, if they request it.)
1 tablespoon olive oil
1 tablespoon toasted sesame oil
2 garlic cloves, peeled and chopped
1 teaspoon chopped ginger
1 pound of firm tofu, cut into to 1/2 inch cubes (you can use white meat chicken breast or tenders instead of tofu, or add both for a non-vegan variety)
2 large scallions, minced
1 cup pea pods, washed
1 cups carrots, thinly sliced
2 cups mushrooms
2 cups of bok choy
2 cups chopped broccoli
1/2 red bell pepper, chopped
1/4 cup orange juice
1/4 cup tamari, or to taste
1 tablespoon lemon juice
1 tablespoon brown sugar
Salt and pepper to taste
Optional: Add 2 teaspoons of arrowroot powder to the orange juice to thicken the mixture.
You can add other vegetables like cauliflower, a few leaves of greens, chopped fresh spinach (at the end of the cooking), bean sprouts or water chestnuts. You can make this your own by making up your own combo or add leftover vegetables from the refrigerator. Two packages of frozen stir-fry vegetables (slightly thawed) will work, too.
Add 1/2 tablespoons of oils to large stir-fry pan and saute garlic and ginger for a minute or so on medium. Add scallions and saute until soft and a little browned. Add the tofu and saute until browned. (You can add the chicken here instead of the tofu.) Remove tofu (and/or chicken) to a bowl.
Add remaining oil to pan and saute the remaining vegetables. When they are softened but not well-done, add back the tofu (and/or chicken). Add the orange juice (add arrowroot with orange, if desired), tamari, lemon juice, brown sugar and salt and pepper. Cook until mixture thickens but before vegetables are soft. Serves 6 to 8.
Crab meat and Shells Pasta Salad
1 box (12 oz.) of small shell, wheat pasta, cooked
4 cups raw blanched English peas, shelled (or you can use frozen, uncooked peas)
2 cups celery, chopped
4 scallions, chopped
1/4 cup chopped parsley, finely chopped
2 tablespoons lemon juice
1/2 to 1 cup mayonnaise
1-1/2 to 2 pounds crab meat (I have used the faux crab meat with great results)
Cook pasta and drain, set aside. In large bowl mix peas, celery, scallions, parsley, lemon juice and 1/2 cup of mayonnaise. Add shells and crab meat. Mix gently and add enough mayonnaise until the mixture lightly covered with mayonnaise. Chill thoroughly. Serves 10 to 12.
Subscribe to:
Posts (Atom)