Tuesday, July 10, 2012

Summer tomatoes


We are now eating tomato sandwiches for the first time this year and they are wonderful! I don't know if everyone would agree, but I know that home-grown tomatoes are the best and I truly believe organic ones have even more flavor than tomatoes that are conventionally grown. Of course I certainly can't prove it.

I do know that we are having the best tomatoes we have had since we starting gardening. We have dozens of huge tomatoes that will cover more area than a  piece of bread, slathered with mayo. Many of them are larger than the palm of my hand and a few are larger than the palms of both hands.


We have several varieties. Two from Renee's Seeds, a patio variety and Chianti Rose. They were grown from seeds months ago and transplanted in two stages for (hopefully) continual production. We also have a few Brandywine tomatoes, a couple of yellow tomato plants and one San Marco, which is a meaty Italian tomato that should make great tomato sauce. The yellow tomatoes and the San Marcos are a little behind the larger tomato plants.

We did do a few different things this year. For one, I didn't pick off any suckers. I have always done this, but I am thinking the extra foliage kept the tomatoes shaded and seemed to help grow more, and bigger tomatoes.

We also heavily limed our garden last fall. I think this helped with tomato diseases. We also have used BT to prevent worms and diotomaceous earth to prevent crawling bugs and I must admit they look amazing.

One other thing--my husband found some organic Miracle Gro and he used that at the beginning of the season and that did seem to really help everything.

We also mulched and it does seem to make a difference in a season that is often too hot and dry. Even though we have had a number of challenges, our tomatoes do seem to be doing well.


You can see that I have a counter top full of tomatoes in various stages of ripeness.


Our challenges. The really hot weather, not enough rain and we have had a critter of some sort that has been getting a few of the tomatoes we were trying to let ripen on the vine (also our watermelons, but that is another story). We have picked the tomatoes a little greener than we prefer just to prevent either the rabbit, mice, raccoon or opossum that has gotten about 6 or more tomatoes, so far.

I did throw out some Milorganite which is supposed to be very stinky, is organic and reportedly will repel deer and other varmints. We didn't see any more damage but I can't be sure it will last. We will have to try and outsmart whatever animal it is. Right now I am winning but it is a struggle.

Meanwhile, we have been feasting on tomato sandwiches at my house lately--and we love it!

Thursday, July 5, 2012

Creative Flag Idea


I know I am a day behind, yet I thought this cute dessert idea from my daughter was easy and priceless. What a fun way to celebrate. She arranged blueberries, strawberries and marshmallows in a celebratory way.

As I looked at it I thought a rectangular platter might have been better then I changed my mind. This is perfect. She reported that it was gone in minutes! Cute and easy idea.

Monday, July 2, 2012

Green Market Baking Book


I have another new cookbook. I will tell you that a person who loves cooking and recipes, as I do can not have too many cookbooks. This cookbook however is one that is a little different from any than I own because it looks first at the benefits of locally grown foods and it also looks at the benefits of using natural sweetners rather than refined sugars--something I have long been interesting in exploring.

It is written by native Georgian, Laura C. Martin who has penned at least 24 books on gardens, crafts, recycling and even one book on tea. She also has been a columnist for the Atlanta Journal-Constitution and has conducted workshops on various subjects, including gardening and baking. She presently devotes much of her time to a charity that teaches Haitaiian women to become self-sufficient by recycling donated ties and other items into such decorative and useful items such as purses, dolls, angels. The website is tiesthatmatter.org and the story there is fascinating.

Though I am beginning to be tired of the "green" handle people place on products products and services, just to sell them, I am totally committed to raising organic vegetables and trying to live a safer, more chemical-free life. I appreciate all the hints and tips she gives in this book.

What I really love about this book is the fact that it opens a whole new avenue of thought for me. I already love the idea of "buying local," I just hadn't thought there were so many ways to add wholesome flavor and goodness to sweet products that just might not raise my blood sugar quite as much as corn syrup or refined sugars. It is at least opening my eyes to the possibilities.

I like that the recipes are from multiple contributors and that most of the recipes are simple, without too many ingredients. I like the recipe listing by themes, like Things Kids Like, Wheat-Free Dishes and Fancy Desserts. I also love the pretty design, clean look and the notes and tips that are highlighted so I don't miss them. Last but not least, I really love the little green ribbon that helps me keep my place in the book. I know I will use this book as a reference and I am happy to add it to my collection of recipe books.

Friday, June 29, 2012

Making a pinata


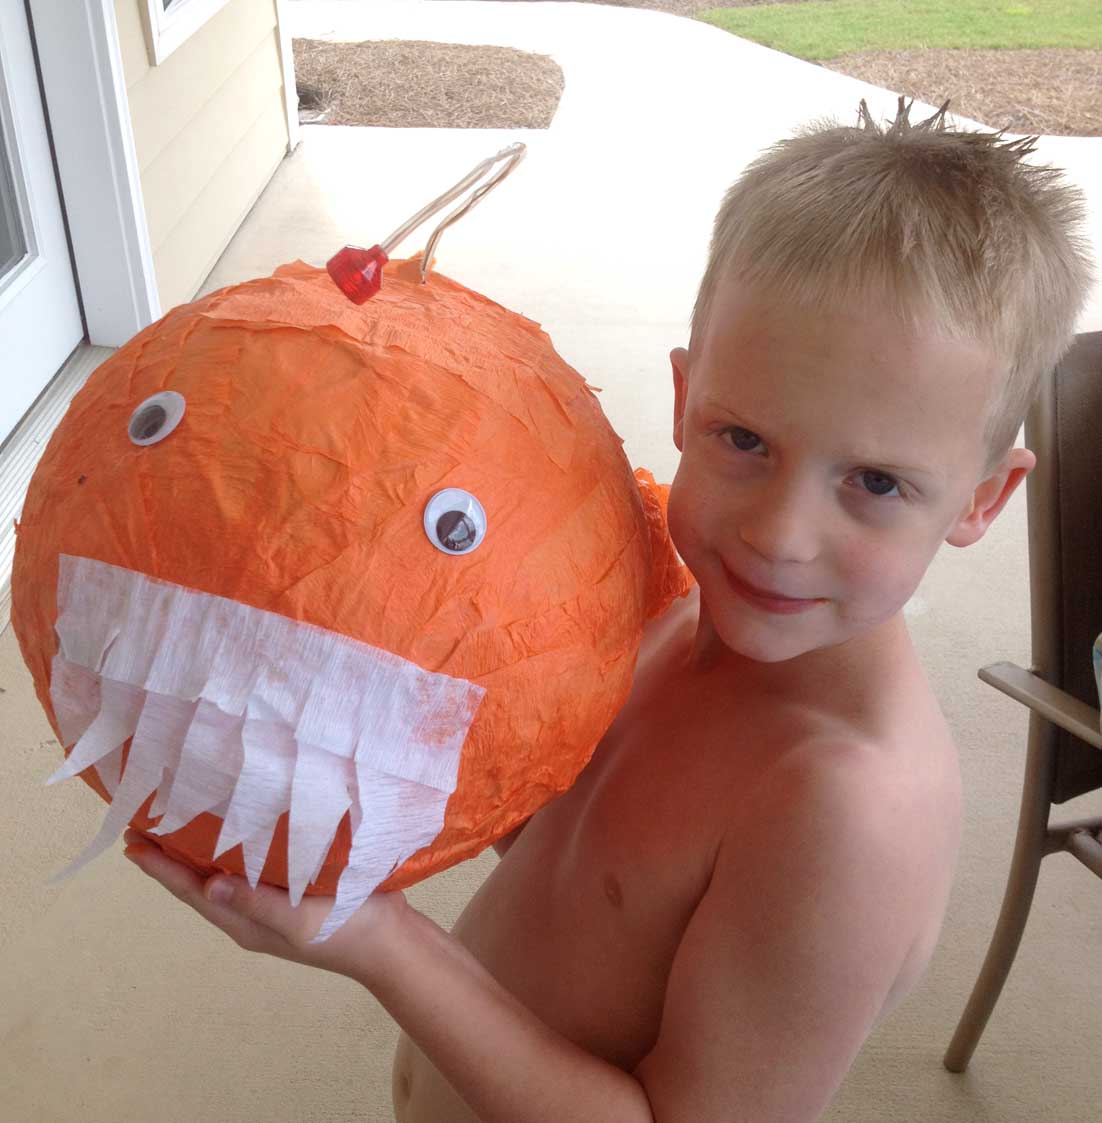
 For Elijah's birthday party we had to make our own pinata. We couldn't find an angler fish pinata. There were sharks and tropical fish, any of which would have worked, but he had his heart set on an angler fish. When he looked at me with those baby blues and said, "We can make one," in his best pleading tone, I knew I had lost that battle. We got to work and made one that made him quite happy. At the party he told everyone, "I made this." They were impressed.


We decided that a blown-up balloon would make the perfect base for our angler fish.

We mixed up our own glue from 2/3 cup plain white flour, 5 cups of water and 2 tablespoons of sugar. There are SO many recipes out there and I usually like mine a bit thinner than some of the recipes, but any of them will do. The glue tends to thicken when it cools and I like being able to brush the glue on rather than slather it on.


I also think that a cooked glue is stronger than one you just mix up without heating. Uncooked glues can also be much more lumpy, but that can be helped by using a wire whisk to stir the flour into the water. I will give a more detailed recipe below at the end of this post.

We covered the floor with paper and then tore out unprinted newspaper to make the fish. There is nothing at all wrong with printed newspaper. It is a great use of recycled materials.


We added a tail onto the fish and fins out of just flappy papier mache. After the fish was dry, we added the finishing touches. Perhaps the easiest part was gluing on the streamers we purchased at the party supply store. The main part of the angler fish was just the rounded form. While looking on the internet we found that they come in so many shapes so you can use your imagination on the shape of the balloon. Don't forget to add a hanger. Any kind of metal hanger worked into the papier mache will do. I think a strong piece of wire would be the best.

We glued on wiggly eyes and white streamers for the teeth. I cut a hole in the top, added a book light and filled it with Rice Krispy treats, fruit snacks and assorted candies. I think some of the parents really like the rice treats. One of the little girls was talking about how she like them and announced that she was going to save one of hers for breakfast the next morning. I'm not so sure the parent would agree with that at breakfast time and I am glad I didn't have to fight that battle! Kids are so funny and sweet!


The other neat party idea was the favor. We purchased small sand buckets and tied a helium balloon to the top. We purchased small beach balls, squirting fish and assorted treats including the mini frisbees and made some buckets for boys and some for girls. We ordered most of these items online and saved money by doing this. The kids really, really loved the favors which included pinata treats.

One tip. If you make the ribbons very long on the balloons and then put them all outside, the ribbons could blow around and tangle. This happened to us. As people were arriving, we were untangling balloon ribbons. It wasn't what we wanted to do but some of the kids pitched in to help and we then left them all inside.

Here are my instructions:

Angler Fish Pinata

Glue (from recipe below)
1 balloon
newspaper (enough to glue on at least five layers of newspaper and enough to protect things from dripping glue and newspaper smudges)
Large wiggle eyes
Hot glue (for attaching the eyes)
Knife and scissors to cut out a flap to insert the light and the candy
1 book light
Masking tape to hold the book light in place
Streamers of the desired color
Wire for the hanger
Enough candy and treats to fill the pinata

In a bowl mix 1 cup water and the flour. Stir with a wire whisk until there are no lumps. Add the remaining four cups of water to a saucepan and heat on medium. Pour the flour and water mixture into the saucepan of water and bring it just to a boil. Using a wire whisk will continue to prevent lumps. Mixture should become much thicker. Remove from stove and add sugar. Allow to cool before using.

Blow up a balloon and tie a knot in the end to hold in the air. Apply paper and glue with a brush or with hands to the balloon. I like to use the glue liberally. Make around five layers and then hang the project by the "tail" of the balloon until it is dried. Be sure to work in a hanger.

If you want, add extra layers. It will be quite hard when dry. Fashion a flappy tail and fins from papier mache. Allow to dry.

Carefully glue on streamers with paste. The streamers break easily when wet. Be sure to add streamers over fins and tail. Allow that to dry.

When fish is fully dry, cut a flap in the top to attach book light and cut a hole large enough for the light to come through. You will want to cut a slit over the switch of the book light so you can turn it on. I used duct tape to hold the light in place.

Make little cuts along the edges of the streamers on the tail and fins to give them a tasseled look.

Use hot glue to attach the eyes.

Attach the teeth with white streamers and then cut the streamers into jagged points.

Add candy and glue streamers over the flap to hide the opening.

The fish is now ready for the party.

Note: Homemade pinatas are not quite as strong as store bought ones. It would be best (and safer) to use a plastic bat.

Tuesday, June 26, 2012

My strawbale squash -- finally looking good


I have given a number of updates about my squash grown in straw bales and I have some photos I am very excited to show today. My squash (in straw bales) really looks great right now. I have six plants that are looking very good. The yellow crookneck squash above are quite healthy-looking. I have already harvested around 5 squash. I think the hot, hot weather has slowed them a bit.


My zucchini was a bit harder to get started and it is a bit behind the crookneck and they look quite good. The windy weather is blowing them around this morning but I notice that I had a number of honey bees swarming around making sure they were pollinated.


This is a view with my squash on each end and my new Green Zebra tomatoes presented to me last night by my friend Angela. She grew them from seed and I hope to baby them in the middle of my strawbales. I was so happy that I finally had something good to share!

Monday, June 25, 2012

Meeting tonight: Caring for hydrangeas

Tonight is the June meeting of Crossroads Garden Club. Our speaker will be Matt Gaddis, one of our members who works at Pike Nurseries. He will be telling us how to care for hydrangeas. The meeting begins at 7:00 pm at 3072 Hwy. 154, Newnan.

Hydrangeas are one of the most popular perennial shrubs in southern gardens. They are beautiful with large showy flowers in beautiful colors. They are often used in flower arrangements and I have been to a number of weddings where hydrangeas were either carried by the bride or by her bridesmaids and graced the tables at the wedding receptions. You know when young brides love a flowering shrub to this extent that there is no danger of going our of favor and will certainly remain popular in landscapes.

My mother had a very pretty hydrangea when I was a small child and I was so fascinated because sometimes the flowers were blue and sometimes they were pink--just because of the amendments she added to the soil. This was fascinating to me.


Lately I have been given a few "pass-along" oak leaf hydrangeas and I am hoping they will grow and look beautiful like the photo above I used courtesy of Anne Norman on Wiki Commons. My oak leaf hydrangeas look kind of like little sticks with a few green leaves sticking out right now--and nothing like the one above. I am hoping to learn from Matt just how to give them the best care possible.

I also would like to add more hydrangeas to my landscape. I don't think there is anything better so I can't wait to see what Matt has to say. I will be taking some good notes and will report his tips for growing beautiful hydrangeas later in the week.

Friday, June 22, 2012

Angler Fish Cake


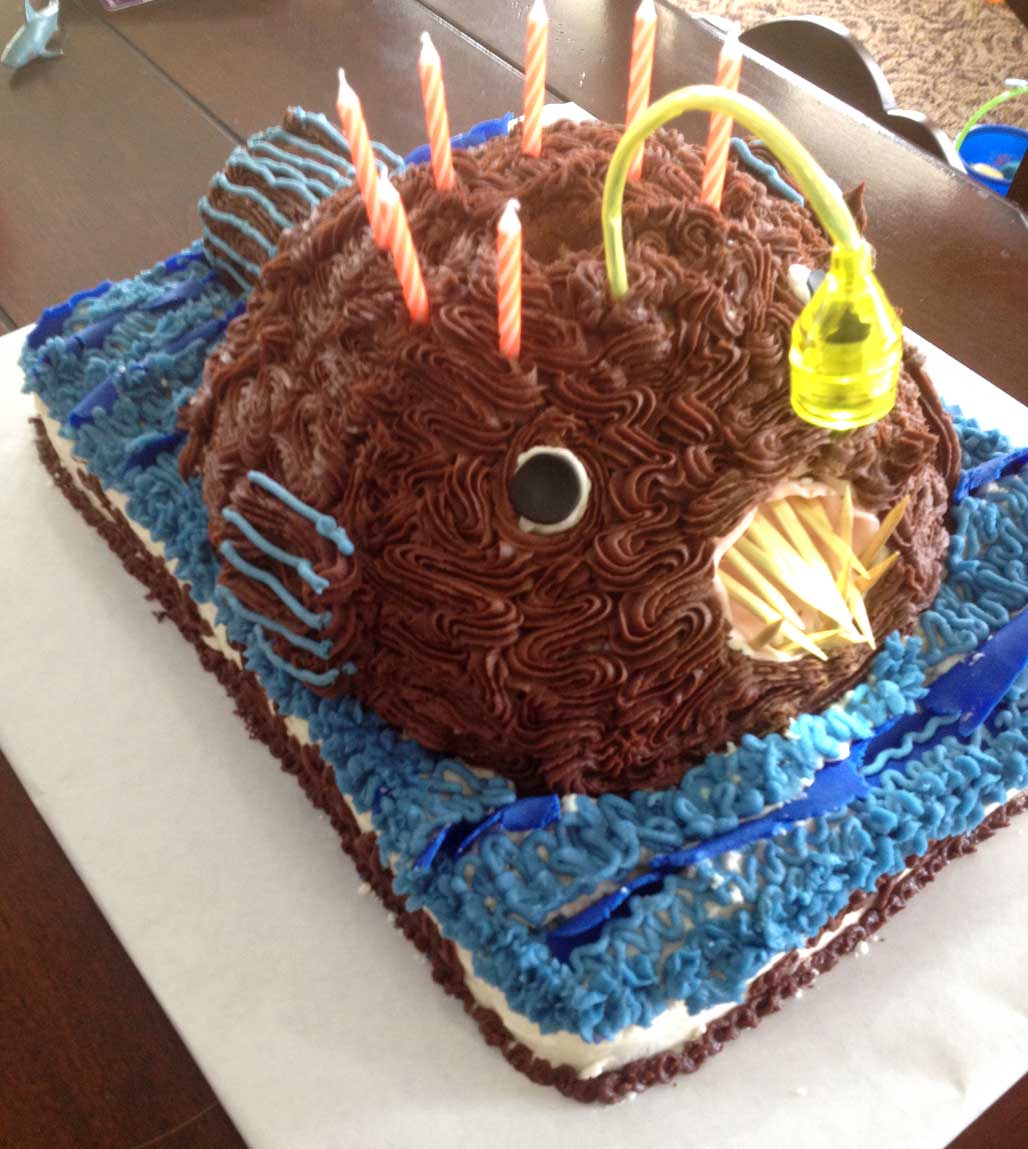
We recently had a birthday party for our 7-year-old grandson. I have found that there is only one problem with telling a soon-to-be 7-year-old he can have any kind of cake he wants for his birthday party. It means you had better to be ready to make a very unusual cake. His choice for his "Deep Sea" Birthday Swimming Party was an angler fish cake. It had to be swimming in the "ocean" and had to have a book light inserted and teeth, just like the fish in Disney's Finding Nemo movie!


I think it turned out fine, but a cake sculpture is always a challenge. This one actually took 2 yellow cakes, one for the base and one for the fish, 2 recipes of decorator's frosting and 1 recipe of chocolate decorator's frosting. If I had been feeding more than twenty people, I could have made an extra layer for the base. For this base above, I made one rectangular cake then covered a large plastic cutting board with butcher paper and poured the cooled bottom layer out on the board. With my decorator's icing I put a thick "crumb coat" of icing on the base.


Something with a mounded shape is pretty easy to make. In addition to the bottom rectangular cake, I made two 9-inch layers and cut one of them in half, then cut the second layer in three pieces so that I had two small semi-circles and a long piece to make the fins and tail. Use icing between each cake section to "glue" all the pieces together until you have a basic fish shape. I didn't use any dowels to hold them together. With tall designs dowels are necessary but with this shape, the icing was enough to make the shape.


I then put a crumb coat over the entire fish. I took a book light and wrapped everything but the on and off switch with a tight piece of tin foil and inserted it into the cake top. This was important because you don't want the battery to get wet! It might not work if it became wet and I can't imagine that batteries and cake could mix so I was extra careful with wrapping the book light's base. I cut a mouth out of the fish and lined it with rolled pink fondant.

The sides of the base were iced with a nice layer of icing and then smoothed all around. (I always use a large damp spatula dipped in ice water for smoothing.) The chocolate frosting went into a decorator bag and I swirled it all over the body of the fish. The fins and tail were piped with straight lines of chocolate frosting. I left places out for the eyes.


It was then time to decorate. The birthday message went on the sides of the cake in chocolate icing and small beads of frosting were piped all around the bottom of the cake.


The teeth were made from points of wooden skewers cut with scissors and inserted into the mouth. Eyes were fashioned from a small amount of frosting piped into the space I left and topped with a circle of fondant. (I found that the bottom of a metal decorator's tip made a great tool to cut out the eye circles from black fondant.)


The waves were made from slices of fondant and blue icing piped in wavy swirls with a small swirl bordering the top of the cake. By request, the tail and fins had blue lines for definition. We were then ready for the candles and a party. I usually transport my cakes in boxes with butcher paper taped to the top or I use plastic bins.


Elijah was VERY happy and though he always likes to help with the entire cake, I had it basically ready for him, except for the final decorating touches. That was enough for him and I get a bit nervous when trying to "glue" together cake pieces. He was able to help with the teeth, the eyes, the fins and the waves.


It was also his job to turn on the light. Here at the party, we waited for cake time which was after the swimming.


Everyone had to come inside to blow out candles because it was a little too windy at the pool.


But everyone loved the cake and thought it was really cool.