
I just received an email that asked, "What would you do if you could add an extra day to your year?--Wait, today is that extra day!"
That gave me some food for thought. Today is an extra day we have to catch up and for me, to do some extra garden planning. It is also a rainy day and that isn't exactly what I had hoped for, but as a gardener, I do think rain and proper planning are essential.
That is why I wanted to recommend one of my favorite informational websites. It is a website that gives you a bit of everything, from houseplants to regional zone info. It talks about bugs and gives you information on almost every topic. I really like the regional garden guides, the calculators, the plant finder and the pest control library.
It would be hard to answer every question that comes up, but this website attempts that.
Of course what you may want to do on this drizzly and possibly stormy leap year day is sit down with you latest garden book and have a good read. I would suggest that a nice cup of Earl Gray topped off with cream in a comfy armchair would just be my idea of heavenly.
Wednesday, February 29, 2012

Sunday, February 26, 2012
Seed starting progress

Last week I planted some of my seeds in peat pots so I could transplant them in our garden later in the season. I am already having more success in this attempt at seed starting than I did last year. One of the things I am doing differently putting my plants under a grow light. Last year I just put the seeds in a room where we had a daytime light source. They grew, but it wasn't spectacular. This year the grow light is making all the difference.
To see how what I did to start the seeds go to my blog post on starting seeds indoors.

Almost a week ago I started with the little Jiffy starter pots above. I bought them at my local WalMart and I ordered some seeds online and bought some in the store.

Above, in the foreground are my Evergreen bunching onions and at the top of this photo are the my American Flag Leeks. I will have to work with them make sure they are hearty enough to plant in the garden. Last year, my onions didn't grow at all.
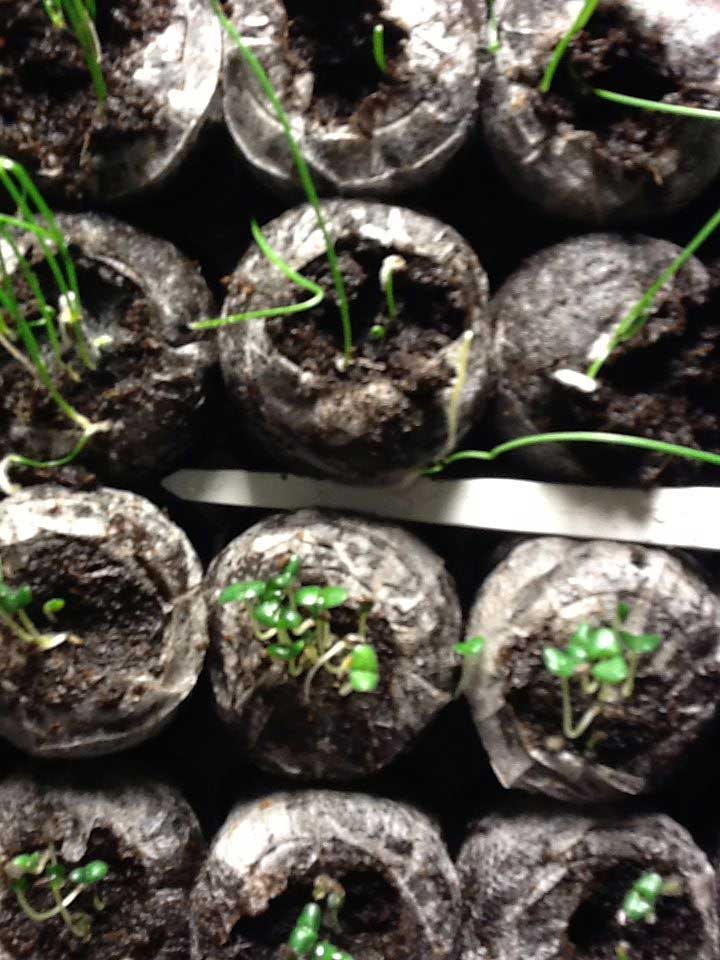
At the bottom of the above photo are Munstead English Lavender sprouts. Last year, they didn't sprout at all.

In this photo are the tomatoes I have sprouted. Last year I was able to grow some tomatoes but I had problems with the seeds floating all over the trays. They haven't all sprouted yet.

I also have a few cilantro plants. I am very excited about that, too.

None of my pepper seeds have sprouted. I do think they will but it takes longer for them. It might be next week for pepper plant sprouts.

I think the basil is my favorite. Last year, I bought basil plants for $3.49 per plant. That means I have about $84.00 worth of plants here. That is especially wonderful when I think about how much I will be saving if I can grow these plants and transplant them into the garden. I am especially excited to know that the grow lights are increasing the chances of my success.
Thursday, February 23, 2012
Brussels sprouts and honey bees

This past weekend I looked at our garden and noticed several things. First our Brussels sprouts are heading on the top like cabbages. Is this normal? We still are getting little Brussels sprouts on the stems but I am so surprised that we have one great big cabbage-like top. As long as the weather stays cool we will have these wonderful sprouts but if they stop producing and start making loose sprouts, we will try the top and probably shred it and cook it like cabbage.

The next thing, we have honey bees. We have been concerned that we haven't seen bees in our garden for the last couple of years. No bees. We have bumblebees but no honey bees until this winter. We have let some of our plants like this mustard go to seed to draw bees and we are so glad that they are back -- not in droves, but we have seen a few each time have have been to the garden. That has to be a good thing. I certainly had a problem getting a photo of this little honey bee. He was really dodging my camera. Click on the photo if you want to see our friendly garden helper.
The other thing was that it was so nice to be back in the garden. It was something I have been missing. My sister and I both agreed it would certainly be nice to start our spring garden. It's hard work but it's fun, too.

I also wanted to remind everyone about the charter meeting of the Crossroads Garden Club on Tuesday evening, February 28th, at 3072 Highway 154, Newnan, Ga. It will be nice to get that started, too. We are really looking forward to beginning this club. If you need more information follow this link.
Tuesday, February 21, 2012
Crossroads Gardening Club
My sister and I are starting a new garden club named the Crossroads Garden Club. The meetings will begin with an organizational meeting on February 28th. This is a club for local residents, but we will be offering online memberships after this date. I have added a link here for more information.
Monday, February 20, 2012
Lavender

Last week my very sweet sister dropped off this beautiful pot of French Lavender for Valentine's Day. It already smells wonderful, even though it is not yet blooming. It's almost to the blooming stage but not quite. I can't help but wonder when the growers started growing such a mature plant for it to be so large at this time of year.

I know I will treasure it because I have wanted a lavender hedge since I went to the Biltmore Estates several years ago and walked in their gardens. The main garden was surrounded by a hedge of sweet-smelling lavender. Everywhere you walked, the smell followed. Their lavender hedge made a very pretty, hazy purple border around their garden. It was a beautiful experience.
I love lavender because it is such a sweet-smelling herb. It has so many useful purposes, including adding fragrance to cleaning supplies, bath soaps and perfumes. It's edible, you can add it to shortbread or other recipes and did I say I just love it?
I think the leaves are so unusual and such a nice green -- almost fern-like.
We did plant one lavender plant in our herb garden last year. It didn't grow very much but looks like it will come back in the spring and I thought that was a good start, but ...

I did receive some English Munstead Lavender seeds from Renee's Seeds and I have planted them in Jiffy seed pots and put them under grow lights. I hope they sprout and grow for me, though some herbs can be hard to grow. I will then have both English and French lavender and I will certainly be drying lavender for sachets and more. That is my plan. I will keep you posted on the progress.
Thursday, February 16, 2012
Green tea "ice cream"

There aren't too many products out there that have as many positives as negatives. The people at the unlikely-named company of Turtle Mountain have developed some products that make me wonder if it is possible to combine "healthy" and "pleasure."
This company makes the So Delicious dairy-free and soy-free products that include coconut milk and now almond milk. I have tried their coconut milk and I wasn't too impressed, though I do think coconut milk is good for you because it contains no trans fats.
In my opinion, the problem with the coconut milk is that it was kind of bland and didn't taste anything like coconut. Now maybe that is a good thing, since people are sometimes put off by the flavor of coconut. I am not. I LOVE the taste of coconut. You could make my "milk" taste just like fresh coconut cake and I would be delighted, but the cartons of coconut milk products in the dairy case usually don't.
Now for the ice creams. They are very yummy. There is a hint of coconut in every one I have tried. There is a richness and smoothness to all of them, too. Totally yummy.
If you have allergies, you would probably be very happy with So Delicious products because they have some very delicious dairy treats like the Green Tea Coconut Milk ice cream, pictured above. I can also say it is very hard to beat the So Delicious chocolate ice cream.
The only down side is that for some people like me, calories are calories. These products probably won't help you lose weight but they are very nice for an occasional treat and it can't hurt that the green tea variety has plenty of antioxidants. I can also tell you that the price is pretty high in the grocery stores. Both Publix and Kroger carry these products. They don't carry as many flavors as I would like. It's most often just Vanilla and Chocolate, but they are good and free of the most common allergens. Just like everything else, don't over-indulge and your waistline and pocketbook will thank you.
Here is the link to the website. You can sign up for a coupon and if you are like me, you can drool over their flavors.
Tuesday, February 14, 2012
Happy Valentine's Day!

I made a gardening craft especially for this day. Please go to my gardening blog to see it. Here's the link.
http://twosistersgardening.blogspot.com/
Monday, February 13, 2012
A weekend of crafty Valentine projects

I spent much of this past weekend working on Valentine treats and crafts. I liked the finished projects, but many of the decisions were made by a precocious six-year-old. (This is not really a complaint, but if I had been choosing, most of my choices might have been for flowers and pink, frilly things. I am kind of happy with the primary colors, duck tape, teeth and super heros that the little boy who ramrodded this operation chose.)
The first, a Valentine's Day mailbox very similar to one we saw on the internet called a Chews-a-card Valentine Box. This will be entered into a school competition tomorrow and will then hold his Valentine treats.
I believe the original was made from a Kleenex box but was a bit too small for our needs. We made it from a very sturdy square box left over from Christmas and we cut a cardboard front from another box, glued white foam teeth to the inside, then covered it with red duck tape and cut out the mouth with an x-acto knife.
Using two red coiled pipe cleaners, we attached them in holes punched in the top of the box and secured them with a dab of hot glue. To the other end we attached ping pong balls. A sharpie was used to finish the eyes. We decorated the piece by adding pipe cleaner hair and foam stickers for the nose and ears (not shown but on the sides).
The gold dots on the face were the hardest thing we did, because they we so hard to cut from the duck tape. I think it is cute and I love using duck tape to cover things. It comes in great colors and is easy to use. Cutting out circles was a chore but the tape covered the box to perfection. A photo shows up the tape lines but they really don't show up so much if not in a photo.

This project looks kind of complicated but pretty easy making it perfect for the attention span of a six-year-old, though it did take plenty of adult supervision. His favorite part was coiling the pipe cleaners and deciding where to put the dot. It also took experimentation to see if the Valentines would be easy for the monster to "chew."

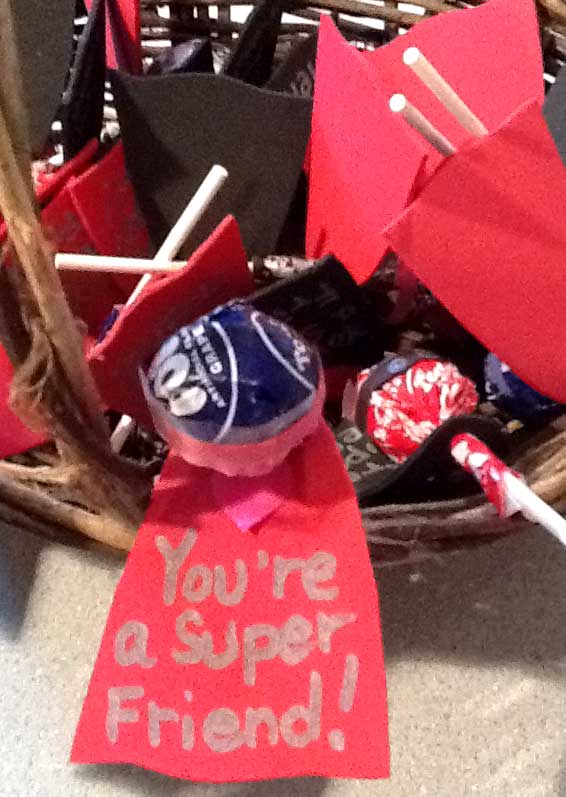
The other craft, Valentine party favors, were made from tootsie roll pops, foam, construction paper, black and silver sharpies, a heart sticker and some clear tape.

My daughter found this idea on Pinterest and I think it is a cute idea for giving to friends at school. I downloaded the pattern for the little cape and mask. Who wouldn't love a little super hero with the words, "You're a super friend" in silver on the cape. The stickers we already had.
We really wanted to make them from all red Tootsie Roll Pops but couldn't find enough of them to use, so we had to use a bag that included yellow, blue, brown and purple but somehow I think they work. Another suggestion might be to use Blow Pops.

We downloaded the pattern, cut it out, wrote on the cape, added the heart sticker, cut out the hole with a hole punch. We then cut out the mask from the pattern, drew on the eyes and taped on the mask. The stick was then inserted into the hole on the cape. I used foam for the capes but after it was finished, I think construction paper might have been better. Felt could also have been used. The masks were made from contruction paper and though the directons said glue them on, I found that tape worked just as well for the mask. I was concerned that glue might have made them inedible. They are cute, cheap and easy fun.
Here's the link for the Caped Cute-sader on Family Fun.
I had fun but I am kind of glad the weekend is over!
Friday, February 10, 2012
Duck eggs

A couple of days ago we bought some duck eggs.
Most people would ask why in the world would you do that? Actually, it is because we have a couple of family members who are allergic to chicken eggs and sometimes people with a chicken egg allergy can tolerate duck eggs.
I was a little surprised by this but there is enough difference with these eggs to make them OK for some people with egg-related allergies. Before substituting duck eggs, you should check with a health professional to make sure it would be a safe food to try. In our case, duck eggs were one of the recommended foods.

Where do you find duck eggs? I found them at a local farm, 180 Degree Farm. These are ducks fed an organic diet and though they were expensive compared to chicken eggs, they are great for an occasional treat for someone who can't eat regular eggs.

One thing you will notice about a duck egg -- they are equal to one and a half chicken eggs. Their shells are a big tougher and harder to crack, too. They have more protein so they are supposed to beat more stiffly than chicken eggs. There is a little more fat and the yolks are large. This all can make quite a difference in a recipe. I have read that because of this, some chefs prefer duck eggs for cakes because they give it more lift.
This is new territory for me. From now on, if you see some of recipes including duck eggs, you will know why. Again, before trying them, check with a health professional, but if you like eggs and can't eat them, or if you would love a light and airy cake but must stay away from chicken eggs, this is worth a try.
Thursday, February 9, 2012
Valentine gifts

Every year around this time I think about what to get my husband for Valentine's Day and I keep on coming back to this recipe for truffles. He loves truffles and I don't mean all the fruit-flavored truffles that Whitman sells. The honest to goodness chocolate, chocolate covered in chocolate kind. They are so hard to find but they are the only kind he really likes.
If I buy him the flavored ones, we wind up with a box full of half eaten chocolates we have to throw away and somehow that seems so wrong.

I am thinking about either making the truffle recipe I made him a couple of years ago. He really loved them and they were tasty and easy -- but not healthy. If I have time this weekend, I may try to come up with an alternative. Here it the recipe I used then. They were attractive and good. I even found perfect gift boxes and tied them with a pretty ribbon.

I am also working on this cute garden Valentine craft -- not for my husband, of course, but as gifts for teachers, gardening friends and anyone I think might like them. The inspiration for the mini seed starter pots came from MarthaStewart.com. I have already purchased some mini pots (24 cents each at WalMart) and some seeds. I now must get my seed packages ready for the big day.
Tuesday, February 7, 2012
An easy recipe for toasted pumpkin seeds
It's not often that you find a treat that is healthy, easy to make and kids like it -- at least our kids do.
We have a hard time keeping them around because we all have to grab a few each time we pass by. Usually pumpkin seeds are toasted in the oven, sometimes with oil, but this pumpkin seed recipe contains only spices and water, yet they are so crispy and good.

We have a hard time keeping them around because we all have to grab a few each time we pass by. Usually pumpkin seeds are toasted in the oven, sometimes with oil, but this pumpkin seed recipe contains only spices and water, yet they are so crispy and good.

Above, the pumpkin seeds before heating. We put them in a pan specially made for the microwave from Pampered Chef but any microwave-safe bowl will do. Here's the recipe:
Toasted Pumpkin Seeds
2 cups raw, shelled pumpkin seeds
2 tablespoons water
1/2 teaspoon salt
1 tsp onion powder
1/4 teaspoon garlic powder
Stir
together all ingredients in a microwave safe bowl with lid. Cover and microwave on high for around 3 minutes (our microwave
isn't as high powered as some, so adjust your times as needed). Remove
and stir. Cover and microwave another 2 minutes. Stir again, then
microwave for one more minute. Stir, then set on the counter until
cooled. Transfer to an airtight container and enjoy!!

After heating, they have puffed up to almost double their size and are a brown and crunchy treat!!
Monday, February 6, 2012
A great day in the garden!

It has been way too long since I spent any time in the garden. Towards the end of last week my sister called and said we really needed to do some harvesting. We didn't have tons of broccoli but you can see some of it is flowering. It is still edible but not quite as good as if we had picked it last week. We harvested about a quart of broccoli. Most of it looked better than this.
Winter gardens are the best. They provide all these lovely vegetables without quite so much work! Early in the season there is tons of work, but we can now just go every now and then and pick vegetables -- maybe occasionally throw out some fertilizer. It's great because there are not many pests. The electric fence keeps the four-legged pests out and the cooler temps encourage the bugs to hibernate. We took the time to mulch when we planted to keep any cool-weather weeds under control. That all means less work and less stress

Our Brussels sprouts are doing well. I am hoping they will continue to add sprouts as they grow taller and taller. We could have sprouts until the weather warms in late spring. We picked about a gallon and the plants still look hearty so I think we will have more.

We still have some beautiful collards. It looks like the insects are more interested in the outside leaves -- that is very good. The inside leaves are the best.

Our mustard has gone to seed and it is providing some nice color. We did see some honey bees on the mustard blooms and that is exciting because honey bees have been scarce in the past couple of years. Seeing them now is very encouraging and I hope the bee population makes a comeback in the spring. That is one reason we are leaving our flowering plants. We want them to make a "beeline" to our garden all year to pollinate our blooms.

And the best surprise we had were some really beautiful turnips. Some were the size of apples. Last year I baked my harvested turnips with garlic and they were delicious -- so much so that I will bake these the same way. We have already picked double the amount as last year and they are much larger, probably because I bought Purple tops and they are supposed to grow nice and big. We didn't pick them all so hopefully they will continue to grow and we will have a second harvest by spring.
My sister and I decided that it was fantastic to be back in the garden, especially since we could harvest so many tasty treats.
Friday, February 3, 2012
Renee's Garden Seeds

A few weeks ago, my friend and colleague, Angela McRae gave me the opportunity to pick out some sample seeds from Renee's Garden Seeds. It is a company in California that sells garden seeds in beautifully decorated seed packages.
Angela asked if I would like to pick out seeds to try from a media kit she had received and I was delighted. I had purchased their seeds before with a good outcome but I had never visited their website. The Renee's seeds I purchased were from a retail store, Hastings in Atlanta.
I chose some seeds I had been looking for, like Munstead English lavender, golden beets and Romanesco Italian zucchini. I also ordered gourmet baby salad mix, Wasabi arugula and a package of beautiful heirloom tomatoes named Chianti Rose. I saw a number of seeds developed to grow in containers and from those I picked Astia, a container zucchini and Super Bush, a container tomato.
Their seeds are often packaged in mixtures and groupings. They have mixtures of seeds like the Italian Roasting Peppers I ordered which come in a mix of colors. There are a number of seeds packaged this way -- like eggplant and carrot trios and even a package of "jewel-toned" beets.
Renee's Garden Seeds carries a large selection of heirloom and organic seeds but also specialize in designer vegetable seeds for any culinary experience -- and that is just the vegetables.
The flowers come with seeds in a variety of colors and types -- all beautifully packaged. It is no wonder that they are also used by nonprofit groups for fundraising.

You should check out their website, www.reneesgarden.com. It is packed with helpful information about planting seeds and general gardening.
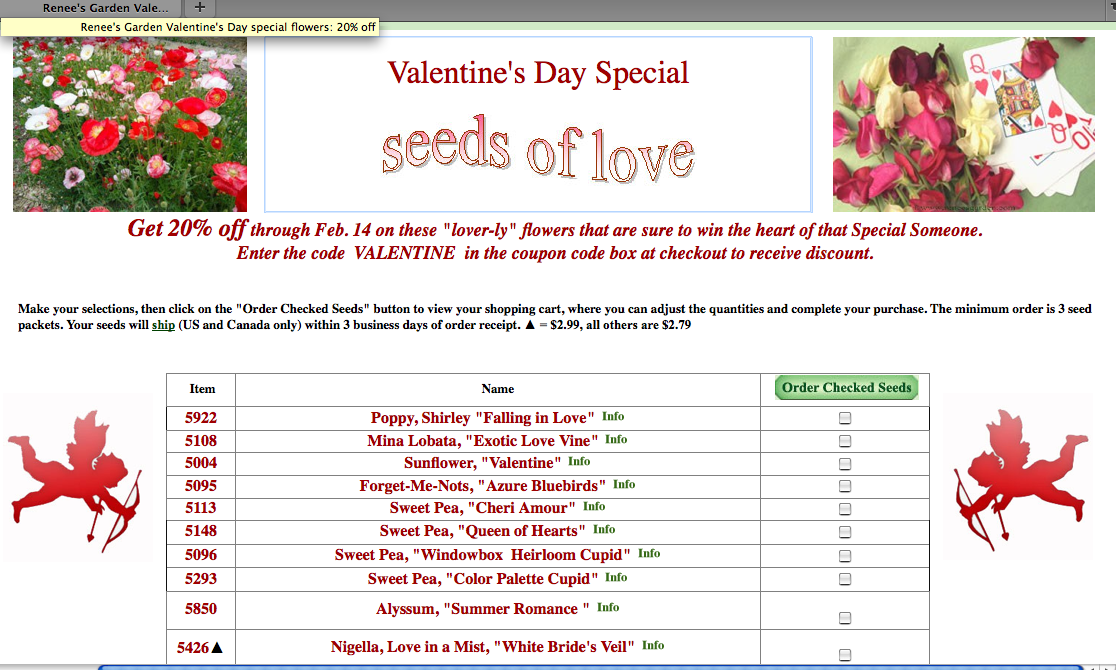
Another thing I really love are the seeds for themed gardens, like butterfly and hummingbird gardens and special seeds for container gardens and shade gardens. These ideas really gave my imagination a jump start. Also you must check out the Valentine collection, "Seeds of Love" that is now on sale.
Thursday, February 2, 2012
My old standby -- Quickie pie

The other day I had to make a dessert to take somewhere and I wanted it to be good, yet easy. I also had some frozen peaches in the freezer from last summer that I needed to use. Not to mention there aren't many desserts better than a peach pie.
When I want to make something very easy I reach for my mother's old standby recipe, Quickie Pie. It is so easy because all you have to do is melt a little butter and pour it in a baking dish, mix up the next three ingredients and top it with fruit. Stick it in the oven and about an hour later, a really yummy pie.
It is sure easier than making a pie crust. So often I forget about old-fashioned recipes but when I pull out one and remember how great they are I wonder why I don't make them more often. This one is so easy. It may take an hour to bake but only minutes to mix up -- and it's so good with vanilla ice cream!
Quickie Fruit Pie
1 stick butter or margarine (Smart Balance works just fine)
1 cup self-rising flour
1 cup sugar
1 cup milk (Almond milk works well in this recipe, too.)
3 cups sliced fresh peaches, slightly thawed frozen peaches or other fresh fruit
Heat oven to 375 degrees. Melt butter in a 2-quart oblong glass baking dish in the microwave. Mix flour, sugar, and milk in a mixing bowl and pour on top of the melted butter. Layer the fruit on top and bake for 1 hour or until golden brown (This recipe will take around 45 minutes if peaches are fresh or canned and longer if they are slightly frozen.)
Wednesday, February 1, 2012
Yummy gluten-free waffles

Belgian waffles are delicious, substantial and make for a special breakfast treat. We usually only ate them on vacation because I never owned a waffle iron, but my daughter recently bought one on sale and immediately worked on a gluten-free recipe for her family.
The first waffles she made were from a carob waffle recipe and while I thought they were exceptional -- they were light and fluffy and the recipe from The Allergy Self-Help Book was a good one, I must admit I really don't care for chocolate or carob waffles, muffins or pancakes of any kind. I am a bit surprised by that but I like my chocolate in candy, cakes and desserts. I don't even care for chocolate muffins. Even I think that is weird!
So, she altered the Buckwheat Carob recipe, leaving out the carob, adjusting a few other ingredients and they were quite a treat. They were nice and crisp on the outside and fluffy soft on the inside, which was perfect! I must admit she did a great job.
One good thing about Waffles is that they can be frozen and then toasted when you need them. The only problem we have had with these waffles so far is that we haven't had any leftovers to freeze.
My daughter's recipe:
Buckwheat Waffles
2-1/2 cups white (or lite) buckwheat flour
2 tablespoons tapioca or arrowroot flour
2 teaspoons baking soda
1-1/2 teaspoons cream of tartar
1/2 teaspoons salt
1/2 teaspoons stevia powder (optional)
2-2/3 cups hemp milk (I used unsweetened) or other milk substitute or water
1/4 cups canola or other oil
1-1/2 teaspoons vanilla extract
Heat
your waffle iron. Mix together the dry
ingredients. Whisk in the remaining wet ingredients until just mixed.
Mixture will be thin. Poor one cup of batter into your waffle iron and
heat according to the manufacturer's instructions.
Remove
and serve immediately. Makes 4 to 5 waffles. Make an extra batch for
freezing and place on a wire rack so that the bottoms don't get soft.
Pop in your toaster and they are almost as good as when you first made
them!
Subscribe to:
Posts (Atom)
