Wednesday, February 27, 2013

Propagating (rooting) plants


This past weekend I took a class on propagating at the Coweta County greenhouse behind the Coweta Extension Office just outside of Newnan. I must admit that I was SO impressed. I paid $15 and went home with a mini-greenhouse filled with fifteen rooting plants. My job is to nourish them until they are ready to pot and then I will be able to plant them in my landscape.


When we arrived at the greenhouse, we were surrounded by plants the Coweta Master Gardeners were growing for their upcoming plant sale in April. Sitting before me were all the items needed for propagating a variety of softwood cuttings. The plastic pots were sitting in front of me all filled with moist potting mix (soil, peat and vermiculite) though the potting mix really didn't matter, the rooting process needs sterile soil but not necessarily rich soil with fertilizer.

Also a dibble, pruning scissors, practice branches (privet limbs) and rooting hormone were all sitting there, waiting for us to learn to root new plants from cuttings.

We learned that there were several kinds of plants to root but we would concentrating on dormant softwood cuttings and began practicing making diagonal cuts, heel cuts and mallet cuts on different kinds of plants. We learned to cut below. We used forsythia (yellow bells), butterfly roses and two kinds of hydrangeas. We then learned to score (scar or wound) the bottom of the plant, dip it in root hormone and push it into the hole in the soil, created by our dibbles.


We then placed our potentially rooted plants into a mini greenhouse--in this case a clear plastic container but other things like a plastic bag or a milk jug would work, too. We were given explicit instructions to leave the mini-greenhouse in indirect sun light for two weeks and mist the plants daily. The lid should remain on during this time except for misting.


On the 3rd and 4th weeks I will be misting every other day and increase the indirect sunlight to 5 hours a day. On the 28th day I will put an inch of water in my green house for a quarter minute and then remove the plants, pour out the water, replace the plants and the lid and continue the every other day misting.


On the 5th and 6th weeks I will mist twice a week and increase the temperature of my greenhouse. On day 42 I will fertilize with a 10% fertilizer solution and on week 6 take off the lid and give the plants one to three hours of sunlight per day. Misting should continue every other day.
If, after 6 weeks, you see root growth out of the bottom of the plastic planters, the plant is ready to pot. The suggested size is a 1 gallon pot using potting mix. The plants can be set out the following spring.

I am very excited. I have never rooted anything except Solomon's Seal and who could have problems with that?

Some important things to remember: It is good to use a temperature gauge so the plants will not get too warm or cold. Always label the plants and date them and keep the cuttings in water and root them as soon as possible. Use at least two nodes on the stem, one above the diagonal cut and a straight cut above the top node. Heavier branches root better. The white centers do not develop roots. It is the thin green cambium layer that grows the roots so try not to scrape off that layer.

Monday, February 18, 2013

Seed starting success


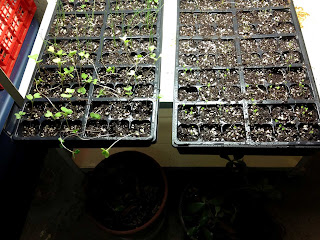
Last month I went to a seed starting class and this month I am really having success with my seeds.

I shouldn't be surprised since I got some great tips from an expert (Mike Cunningham at Country Gardens Farms). I don't think I have it down perfectly but the first two trays are looking great and I am growing them at a much faster pace than in the past.

Above is a photo of the two trays, at left--cabbage, onions, cilantro and lavender and at right dill, chamomile and basil.


I will soon have to repot my first tray and I really don't think the cabbage is perfect. It's much too leggy but the light is doing a great job on all of it and when I repot it to a better pot, I think the stems will be sturdier.

My second tray is barely showing but I have them up enough to go under the lights and to start another tray.

I love my heat mat. I already know I will be ordering another for next year and I can't wait to start on some flowers and vegetable seed.

I would recommend to everyone to take a class on seed starting if at all possible.

Thursday, February 14, 2013

An unusual Valentine


I know that today is Valentine's Day and it's not that I am NOT in the mood to celebrate but it is such a busy work day for me. It's the final two days of working on our March/April Issue of the magazine--always a bunch of work but it is hard for me to get excited about anything else when I am this busy.

I usually make my husband chocolate truffles and put them in a pretty package but somehow, this year I just didn't think about doing making them early enough to buy the ingredients and frankly I'm just a bit worn out. I told my husband (who incidentally has a prior commitment and is out of town and busy in the pm) that I would rather postpone Valentine's Day until another day when I feel more like celebrating and less like finishing a project at work.

I did make this coconut pie earlier in the week and I think it will just have to do as my contribution to the day.

This year I want to make some really good pies and I think I have two good recipes, one for pecan pie and one for baked chocolate pie.

The coconut pie was good, and the meringue is very good.

Here's the recipe:

Coconut Pie

1 baked pie shell
 2/3 cup sugar
1/4 cup corn starch
1/2 teaspoon salt
3 cups milk
4 egg yolks (reserve whites for optional meringue)
3/4 cups plus 1 tablespoon shredded coconut
2 tablespoons butter
2 teaspoons vanilla flavoring

Bake pie shell according to directions and set aside to cool.

In a medium saucepan, whisk together sugar, corn starch and salt. Add milk and egg yolks and mix well with wire whisk. Cook on medium high heat until mixture boils, whisking continually. Allow to boil for one minute while stirring. Mix in coconut, butter and vanilla. Remove from heat and pour into baked pie shell.

For meringue:
4 egg whites
5 tablespoons sugar

With a mixer in a medium bowl, add egg whites and beat on high until they become foamy. Mix in sugar a tablespoon at a time while beating. Beat until stiff peaks form. Pour mixture over warm pie in shell. Put pie in a 400 degree oven for five minutes or until meringue is browned. Remove from oven and cool completely before serving.

Whipped cream can be used rather than meringue.

That's about it. I hope you all have a happy Valentine's Day. Maybe you can make these truffles!

Monday, February 11, 2013

Recipes from food labels


Sometimes favorite recipes don't come from Grandma but from labels on the products we buy--especially the favorites like German Chocolate Cake. My memories of this cake date back to my childhood. My Mother had a number of delicious cakes she made on certain holidays and the German Chocolate cake was one of about five she would bake on the days leading up to the big day.

When we had holiday visitors drop in or a Christmas party, Mother would bring out the cakes (and cookies) and we would have a serving of our favorite, along with our guests. Then it would go back on the shelf or in the fridge until the next occasion. She always had something to take to parties and get-togethers it seemed like so little effort by our Mother, but she spent quite a bit of time before the holidays to make our season more than merry.

In her recipe box, there would be labels and recipes cut from boxes of food products. The German Chocolate Cake was one of these recipe and we always loved it. Actually the correct name is Baker's German's Chocolate Cake on the recipe card I tore out of my newly purchased bar of sweet chocolate.

It is a bar of chocolate formulated for the Baker's chocolate company (now owned by Kraft) by Sam German and the cake was first baked in the kitchen of a Dallas, Texas homemaker, Mrs. George Clay. Though people  have traditionally dropped the possessives when the recipe is printed, it is interesting to note that the recipe is not German in origin--but southern (or southwestern).


This isn't the first time I have made the German's Sweet Chocolate Cake but it is the first one I have made in years. I made this one (pictured at top) for my friend Billy because he has been sick and it is his favorite cake.

I really love the fact that if I want to make certain favorites, I can just purchase a bar of chocolate and get not only a nice recipe, but a list of ingredients on the back so that I will not be able to leave the grocery store without the things I need to make the cake--very convenient for me and smart of the food company.

Other favorites recipes of mine, printed on labels are the Hershey's Chocolate Cake and Frosting, the Knorr's Spinach Dip, the Swan's Down Angel food cake and of course German's Sweet Chocolate Cake.


I often look through my cookbook by Cecil Dyer, Best Recipes From the backs of Boxes, Bottles Cans and Jars, for childhood favorites. It is a great book and often includes recipes that are popular but no longer printed on labels.


I will caution you though. Sometimes the recipes change a little, for whatever reason and the recipe in my book is not exactly the same as the recipe on the inside of the Baker's German's Sweet Chocolate Bar I purchased to make the cake. I do know that the cake I made was really moist and light. Though I will have to rely on my friend to let me know if it is good, I believe I will be making that for my husband in the near future. At least he asked me to make him one, too which didn't surprise me.

Monday, February 4, 2013

Starting seeds


Yesterday was Super Bowl Sunday and while everyone else was getting ready to party, I was starting my seeds for spring.

Several weeks ago, I attended a seed planting class taught by Mike Cunningham of Country Gardens Farm and found it very interesting. As I expected, I learned some very important things I didn't know. The first being that seeds don't actually need light to sprout--just heat.


Because of this, I purchased a seed starting heat mat. It heats up the seeds and aids in sprouting. It is waterproof and will heat the soil to an optimal temperature that will help those seeds just sprout up out of the ground. Then I will have to put them under grow lights because then they will need light.


I did make sure I labeled my seeds by putting a label on the side of the flats.

I only have one heat mat so for now. I can only sprout things one flat at a time. My plan is to buy another heating mat next year--so I can grow more seeds simultaneously.

What seeds did I choose to start first? Golden Acre Cabbage, Evergreen Nabuka Bunching Onions, Munstead Lavender and Cilantro. The photos are not too great but  not bad for my basement. I can't wait to see green.