

We recently had a birthday party for our 7-year-old grandson. I have found that there is only one problem with telling a soon-to-be 7-year-old he can have any kind of cake he wants for his birthday party. It means you had better to be ready to make a very unusual cake. His choice for his "Deep Sea" Birthday Swimming Party was an angler fish cake. It had to be swimming in the "ocean" and had to have a book light inserted and teeth, just like the fish in Disney's Finding Nemo movie!

I think it turned out fine, but a cake sculpture is always a challenge. This one actually took 2 yellow cakes, one for the base and one for the fish, 2 recipes of decorator's frosting and 1 recipe of chocolate decorator's frosting. If I had been feeding more than twenty people, I could have made an extra layer for the base. For this base above, I made one rectangular cake then covered a large plastic cutting board with butcher paper and poured the cooled bottom layer out on the board. With my decorator's icing I put a thick "crumb coat" of icing on the base.

Something with a mounded shape is pretty easy to make. In addition to the bottom rectangular cake, I made two 9-inch layers and cut one of them in half, then cut the second layer in three pieces so that I had two small semi-circles and a long piece to make the fins and tail. Use icing between each cake section to "glue" all the pieces together until you have a basic fish shape. I didn't use any dowels to hold them together. With tall designs dowels are necessary but with this shape, the icing was enough to make the shape.

I then put a crumb coat over the entire fish. I took a book light and wrapped everything but the on and off switch with a tight piece of tin foil and inserted it into the cake top. This was important because you don't want the battery to get wet! It might not work if it became wet and I can't imagine that batteries and cake could mix so I was extra careful with wrapping the book light's base. I cut a mouth out of the fish and lined it with rolled pink fondant.
The sides of the base were iced with a nice layer of icing and then smoothed all around. (I always use a large damp spatula dipped in ice water for smoothing.) The chocolate frosting went into a decorator bag and I swirled it all over the body of the fish. The fins and tail were piped with straight lines of chocolate frosting. I left places out for the eyes.

It was then time to decorate. The birthday message went on the sides of the cake in chocolate icing and small beads of frosting were piped all around the bottom of the cake.
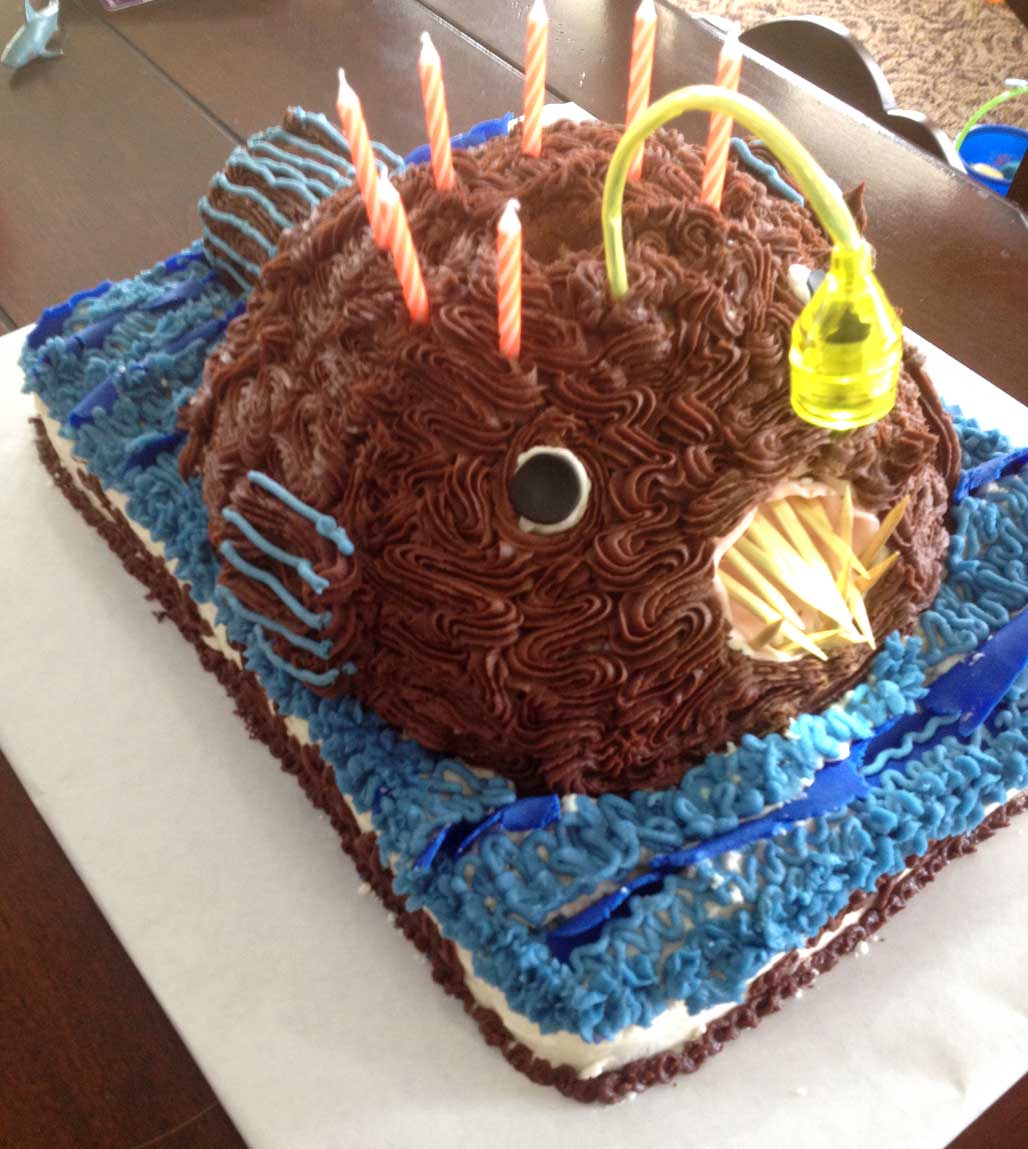
The teeth were made from points of wooden skewers cut with scissors and inserted into the mouth. Eyes were fashioned from a small amount of frosting piped into the space I left and topped with a circle of fondant. (I found that the bottom of a metal decorator's tip made a great tool to cut out the eye circles from black fondant.)

The waves were made from slices of fondant and blue icing piped in wavy swirls with a small swirl bordering the top of the cake. By request, the tail and fins had blue lines for definition. We were then ready for the candles and a party. I usually transport my cakes in boxes with butcher paper taped to the top or I use plastic bins.

Elijah was VERY happy and though he always likes to help with the entire cake, I had it basically ready for him, except for the final decorating touches. That was enough for him and I get a bit nervous when trying to "glue" together cake pieces. He was able to help with the teeth, the eyes, the fins and the waves.

It was also his job to turn on the light. Here at the party, we waited for cake time which was after the swimming.

Everyone had to come inside to blow out candles because it was a little too windy at the pool.

But everyone loved the cake and thought it was really cool.

What an adorable cake - so creative! And how nice that you got to work with your grandson on it.
ReplyDeleteLove the photos and Happy Birthday to him, Joanie
how long did this take you to make? i have to do the exact same thing by saturday and i am dreading it! im in total awe of your talent - it looks wonderful.
ReplyDeleteFor a Saturday party ( which is what we had, too) I baked on Thursday and decorated on Friday. I did wrap the cake in foil after it was baked then stored it in a large covered bin overnight. This wasn't too hard and the book light still works!
Delete